Tuesday, February 5, 2019

Java tutorial: Arrays

References/Links: http://pasted.co/5b178ec6

Chapters

Hello everybody! This is brainy ghosts and today we're gonna discuss java arrays. Array is a container object that holds a fixed number of values of a single type. The length of an array is established when it is created. After creation, its length is fixed. Arrays are also objects in java so they can be initialized using the new keyword.

Creating an Array

Create a source file in our workspace folder and name it "JavaArrays" then write the basic code structure.
public class JavaArrays
{
   public static void main(String[]args)
   {
  
  
   }
}
Alright! let's declare an array.
public class JavaArrays
{
 
   public static void main(String[]args)
   {
     int[] intArr = new int[5]; 
   }
 
}
When declaring an array variable, Putting the "[]" after the variable name is legal.
int intArr[] = new int[5];

Let's examine the array syntax. first, the data type which is int, then the brackets to indicate that this variable is going to be an array reference variable, variable name, then assignment operator, new keyword and the data type and brackets again, but this time, we put a number between the brackets, this number is the size of our array.

To declare an array and initialize its values, we can use this syntax.
public class JavaArrays
{
 
   public static void main(String[]args)
   {
     int[] intArr = new int[]{1,2,3};
     //alternative way
     //int[] intArr = {1,2,3};
     System.out.println(intArr[0]);
     System.out.println(intArr[1]);
     System.out.println(intArr[2]);
   }
 
}
In this code: new int[]{1,2,3} we used braces to group the array values and comma to separate them. The size of intArr now depends on the number of values that we put in braces, separated by commas. This initialization using braces is called array initializer.

The length Attribute

To know the length of an array we can use the length attribute. length attribute returns the length of an array.
syntax: array-name.length;
Code:
public class JavaArrays
{
 
   public static void main(String[]args)
   {
     int[] intArr = new int[3];
     int[][] intArr2 = new int[5][3];
     System.out.println("intArr length is " + intArr.length);
     System.out.println("intArr2 length is " + intArr2.length);
     System.out.println("intArr2[0] length is " + intArr2[0].length);
   }
}
intArr2 is a two-dimensional array. We will learn two-dimensional array later.

ArrayOutOfBoundsException

Be careful when handling array index, if we access an index that is out of range, it may be greater than the length of an array or less than 0, we will encounter an exception called "ArrayOutOfBoundsException".
Code:
public class JavaArrays
{
 
   public static void main(String[]args)
   {
     int[] intArr = new int[3];
  
     intArr[3] = 5; //error
     //intArr[-1] = 3; //error
   }
 
}
When we run this code, we will encounter ArrayOutOfBoundsException, but why? In this example this code: intArr[3] exceeds the length of our array. Our array length is 3, so, our array index is ranging from 0 to 2, but we put 3 as our index in intArr that's why the error will occur.

Now we know when we access an index that is greater than the range of an array, ArrayOutOfBoundsException will occur. Now, comment this code: intArr[3] = 5; and uncomment this code: intArr[-1] = 3; then compile it.

As you can see, we encountered ArrayOutOfBoundsException. We got the exception because -1 is less than 0 and it's consider as out of range. Also, ArrayOutOfBoundsException is a runtime exception, it means that this exception happens when our program runs. We will learn more about runtime exception in exception handling topic.

Adding and Accessing Array Elements

To add elements into an array we need to access an array index.
Code:
public class JavaArrays
{
 
   public static void main(String[]args)
   {
     int[] intArr = new int[3];
  
     intArr[0] = 2;
     intArr[1] = 4;
     intArr[2] = 6;
   }
 
}
In this example, this syntax: intArr[0] grants us an access to intArr index. The number in between brackets is the index number. Another fast way to fill an array is to use loop statement like for loop statement.
Code:
public class JavaArrays
{
 
   public static void main(String[]args)
   {
     int[] intArr = new int[3];
  
     for(int i = 0; i < intArr.length;i++)
     {
       intArr[i] = i + 2;
       System.out.println(intArr[i]);
     }
   }
 
}
We will learn more about loops in future tutorials. All we need to know for now is this code entirely fills up the array and display the values.

We can transfer an array element to another array element, though there are methods can handle this type of process which we will learn later, It is still better to know how to do it manually.
Code:
public class JavaArrays
{
 
   public static void main(String[]args)
   {
       int[] intArr = new int[]{2,4,6};
       int[] intArr2 = new int[]{3,6,9};
       int[] intArr3 = new int[3];
  
       intArr3[0] = intArr[0] * intArr2[0];
       intArr3[1] = intArr[1] * intArr2[1];
       intArr3[2] = intArr[2] * intArr2[2];

       System.out.println(intArr3[0]);
       System.out.println(intArr3[1]);
       System.out.println(intArr3[2]);
   }
 
}
Creating Two-Dimensional Array

The arrays that we were creating recently are called a single-dimensional array. In java, arrays can have multiple dimension, we will just discuss the two and three dimensional array in this example because a four dimensional array and above is very rare to be used in real-life system, even three dimensional array is rare to be seen nowadays.Now, let's create a two-dimensional array.
Code:
public class JavaArrays
{
 
   public static void main(String[]args)
   {
       int[][] intArr = new int[2][3];
   }
 
}
On the left operand, we used two pairs of brackets. These two pairs of brackets indicate that intArr is a two-dimensional array reference variable. On the right operand we also used two pairs of brackets, these brackets indicate that new will create a two-dimensional array object.

Multi-dimensional array is an array that is stored in another array. Let's take a look at this illustration.

In this illustration, we see that intArr array stored two arrays with a length of 3. We can depict two-dimensional array as rows and columns. Take a look at this illustration.


Initializing and Accessing Two-Dimensional Array Elements

Let's initialize our array elements by using array initializer.
Code:
public class JavaArrays
{
 
   public static void main(String[]args)
   {
     int[][] intArr = new int[][]{{1,2,3},{4,5,6}};
   }
 
}
This code here is the similar to the code above but this time our array elements have been initialized. Take a look at this illustration that depicts our array.


Let's try to initialize array elements one-by-one.
Code:
public class JavaArrays
{
 
   public static void main(String[]args)
   {
       int[][] intArr = new int[2][3];
       
       intArr[0][0] = 1;
       intArr[0][1] = 2;
       intArr[0][2] = 3;

       intArr[1][0] = 4;
       intArr[1][1] = 5;
       intArr[1][2] = 6;
   }
 
}
You can refer in the illustration above if this kind of initialization confuses you. This code here and the above code have the same result but with different initialization syntax. Fast way to initialize array elements is to use for loops statement, we will learn how to do that in future tutorials.

Let's access and print array elements. We can use for loop for fast printing of elements, Since we didn't yet discuss for loop statement, we will stay with manual array element access for now.
Code:
public class JavaArrays
{
 
   public static void main(String[]args)
   {
     int[][] intArr = new int[][]{{1,2,3},{4,5,6}};

     System.out.println(intArr[0][0]);
     System.out.println(intArr[0][1]);
     System.out.println(intArr[0][2]);

     System.out.println(intArr[1][0]);
     System.out.println(intArr[1][1]);
     System.out.println(intArr[1][2]);
   }
 
}
Creating Three-Dimensional Array

Let's create a three-dimensional array. To create three-dimensional array, we need to increase the pair of brackets in our array initialization to three pairs.
Code:
public class JavaArrays
{
 
   public static void main(String[]args)
   {
       int[][][] intArr = new int[2][3][3];
   }
 
}
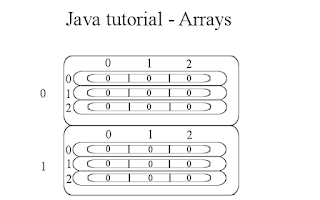
Judging by the syntax, It looks like three-dimensional array is complex. We can look at this illustration to help reduce the complexity of three-dimensional array.


So, the first layer in this illustration represents first bracket pair( [2][3][3] ). Next, in the second layer there are two dimensional arrays that are stored in an array, these two-dimensional arrays have 3 rows and 3 columns. The second layer represents the second and third bracket pairs( [2][3][3] ).

Initializing and Accessing Three-Dimensional Array Elements

Let's initialize three-dimensional array elements by using array initializer.
Code:
public class JavaArrays
{
 
   public static void main(String[]args)
   {
     int[][][] intArr = new int[][][]
     { 
       { {1,2} , {3,4} , {5,6} } , 
       { {7,8} , {9,10} , {11,12} }
     };
   }
 
}
Take a look at this illustration that depicts our array above.


Let's try to initialize a three-dimensional array by using its index.
Code:
public class JavaArrays
{
 
   public static void main(String[]args)
   {
       int[][][] intArr = new int[2][3][2];

       intArr[0][0][0] = 1;
       intArr[0][0][1] = 2;

       intArr[0][1][0] = 3;
       intArr[0][1][1] = 4;

       intArr[0][2][0] = 5;
       intArr[0][2][1] = 6;


       intArr[1][0][0] = 7;
       intArr[1][0][1] = 8;

       intArr[1][1][0] = 9;
       intArr[1][1][1] = 10;

       intArr[1][2][0] = 11;
       intArr[1][2][1] = 12;

   }
 
}
This code here is equivalent to the code above but the initialization is different. Now, let's access the elements and print them on the console. We will learn how to access array elements using for loop in future tutorial, for now, let's access the elements manually.
Code:
public class JavaArrays
{
 
   public static void main(String[]args)
   {
     int[][][] intArr = new int[][][]
     { 
       { {1,2} , {3,4} , {5,6} } , 
       { {7,8} , {9,10} , {11,12} }
     };

     System.out.println(intArr[0][0][0]);
     System.out.println(intArr[0][0][1]);

     System.out.println(intArr[0][1][0]);
     System.out.println(intArr[0][1][1]);

     System.out.println(intArr[0][2][0]);
     System.out.println(intArr[0][2][1]);


     System.out.println(intArr[1][0][0]);
     System.out.println(intArr[1][0][1]);

     System.out.println(intArr[1][1][0]);
     System.out.println(intArr[1][1][1]);

     System.out.println(intArr[1][2][0]);
     System.out.println(intArr[1][2][1]);
   }
 
}
Creating Jagged Array

Another form of array is the jagged array, jagged array contains arrays with unequal length. Jagged array is applicable to multi-dimensional array, it is not applicable in single-dimensional array.
Code:
public class JavaArrays
{
 
   public static void main(String[]args)
   {
     int[][] intArr = new int[2][];
   }
 
}
in intArr array, we see that the second brackets(column) don't have length. Initializing jagged array is interesting because you can set your own length(column) in each row.

Initializing and Accessing Jagged Array

Let's initialize jagged array elements by using array initializer.
Code:
public class JavaArrays
{
 
   public static void main(String[]args)
   {
     int[][] intArr = new int[][]{ {1,2,3,4,5},{6,7,8} };
   }
 
}
In this example, we see that the first and second row element count are unequal. Now, let's try to initialize intArr by using its index.
Code:
public class JavaArrays
{
 
   public static void main(String[]args)
   {
     int[][] intArr = new int[2][];
     
     intArr[0] = new int[5];
     intArr[1] = new int[3];
   }
 
}
In this example, we access a multi-dimensional array like a single dimensional array. As I said earlier, multi-dimensional array is an array that stored another array, what we do here is we get the index of intArr array and store another array in that index, thus, making a multi-dimensional array.

Now, let's initialize intArr elements.
Code:
public class JavaArrays
{
 
   public static void main(String[]args)
   {
     int[][] intArr = new int[2][];
     
     intArr[0] = new int[5];
     intArr[1] = new int[3];

     intArr[0][0] = 1;
     intArr[0][1] = 2;
     intArr[0][2] = 3;
     intArr[0][3] = 4;
     intArr[0][4] = 5;

     intArr[1][0] = 6;
     intArr[1][1] = 7;
     intArr[1][2] = 8;
   }
 
}
Let's access jagged array elements.
Code:
public class JavaArrays
{
 
   public static void main(String[]args)
   {
     int[][] intArr = new int[][]{ {1,2,3,4,5},{6,7,8} };

     System.out.println(intArr[0][0]);
     System.out.println(intArr[0][1]);
     System.out.println(intArr[0][2]);
     System.out.println(intArr[0][3]);
     System.out.println(intArr[0][4]);

     System.out.println(intArr[1][0]);
     System.out.println(intArr[1][1]);
     System.out.println(intArr[1][2]);
   }
 
}
The System.arraycopy() Method

Now, let's discuss some pre-defined methods in java that can help us in our array operations. Let's start with System.arraycopy(), this method copies an array from the specified source array, beginning at the specified position, to the specified position of the destination array. A subsequence of array components are copied from the source array referenced by src to the destination array referenced by dest. The number of components copied is equal to the length argument.
Code:
public class JavaArrays
{
 
   public static void main(String[]args)
   {
     char[] sourceArr = new char[]{'B','r','a','i','n','y',
  'G','h','o','s','t','s'};
     char[] destArr = new char[6];
     System.arraycopy(sourceArr,0,destArr,0,6);
     
     for(int i = 0; i < destArr.length;i++) 
        System.out.print(destArr[i] + " ");
   }
 
}
Result
B r a i n y
Let's examine the arraycopy method parameters. Method parameters are values in method definition parentheses. Method definition is a body of a method. Method call is a statement that can be executed.

This syntax: System.arraycopy(sourceArr,0,destArr,0,6); is an example of method call. The values in method call are called method argument. We will learn more about methods in future tutorials, we just need to learn a bit of knowledge about methods for now.

Now, let's examine the arraycopy parameters. These are the parameters of arraycopy according to java documentation.

arraycopy​(Object src, int srcPos, Object dest, int destPos, int length);

So, the first parameter is src or source, this source is an array with elements that we want to copy. Notice that the type of src and dest are Object, that's because array is an Object type.

Next parameter is the srcPos or the source index position. This parameter sets the index position where the method starts copying. I set it to 0 because I want arraycopy() to start copying at index 0 from the source.

Next parameter is the dest or the destination. Elements that we want to copy will be stored to this parameter.

Next parameter is the destPos or destination position. This parameter sets the index position where the method starts allocating copied data. I set it to 0, So, arraycopy() starts allocating elements at index 0 from the destination.

Last parameter is the length. This argument is the length of elements that we want to copy.

Let's try another example.
Code:

public class JavaArrays
{
 
   public static void main(String[]args)
   {
     char[] sourceArr = 
     new char[]{'B','r','a','i','n','y',
                'G','h','o','s','t','s'};
     char[] destArr = new char[5];
     System.arraycopy(sourceArr,6,destArr,0,5);
     
     System.out.println(new String(destArr));
   }
 
}
Result
G h o s t
Notice this syntax: System.out.println(new String(destArr)); As you can see we create an instance of String without assigning it to a variable. This kind of instance is called anonymous object instance. Anonymous object instance is an instantiated object that is not assigned to any variable. Anonymous object instance is created and dies after.

Let's try using arraycopy() on a multi-dimensional array.
Code:

public class JavaArrays
{
 
   public static void main(String[]args)
   {
     char[][] sourceArr = 
     new char[][]{{'B','r','a','i','n','y'},
                  {'G','h','o','s','t','s'}};
     char[][] destArr = new char[2][];
     System.arraycopy(sourceArr,0,destArr,0,2);
     
     System.out.print("Source");
     System.out.println();
     System.out.print(new String(sourceArr[0]));
     System.out.print(" ");
     System.out.print(new String(sourceArr[1]));
     System.out.println();
     System.out.println();
     System.out.print("Destination");
     System.out.println();
     System.out.print(new String(destArr[0]));
     System.out.print(" ");
     System.out.print(new String(destArr[1]));
   }
 
}
Result
Source
Brainy Ghosts

Destination
Brainy Ghosts
In this example, we used arraycopy() to copy an array object to another array. We see here that arraycopy() can also be used in array type.

The Arrays.copyOfRange() Method

copyOfRange() method is located at java.util.Arrays class. This method is like the arraycopy() method but this time we don't need to initialize the destination array because copyOfRange() returns an array containing the specified elements from the original array.

These are the parameters of copyOfRange() according to java documentation.

copyOfRange​(char[] original, int from, int to);

Parameters:

original - the array from which a range is to be copied

from - the initial index of the range to be copied, inclusive

to - the final index of the range to be copied, exclusive. (This index may lie outside the array.)

Take note of the terms inclusive and exclusive. These terms are going to be significant in our discussion later. copyOfRange() method has many forms and since I'll use char in later example, I chose the form of copyOfRange() with char[] data type in first parameter. We will learn method overloading in future topics.

Let's create an example using copyOfRange() method
Code:

public class JavaArrays
{
 
   public static void main(String[]args)
   {
     char[] sourceArr = 
     new char[]{'B','r','a','i','n','y',
                'G','h','o','s','t','s'};
     char[] destArr = 
     java.util.Arrays.copyOfRange(sourceArr,1,6);
     
     System.out.println(new String(destArr));
     
     //Legal syntax of accessing array object
     //while it's being returned by a method
     System.out.println(
     java.util.Arrays.copyOfRange(sourceArr,1,6)[0]);
   }
 
}
Result
r a i n y
In this example, we assigned copyOfRange() in destArr then we put the sourceArr in the first argument. Then, we put 1 as our initial index position then put 6 as our final index position. Now, let's talk about the inclusive and exclusive.

Inclusive simply means "included", in this case, we say that index "1" is included in copyOfRange() range so our initial index position is 1.

Exclusive simply means "excluded", in this case, we say that index "6" is excluded in copyOfRange() range so our final index position is the index that precedes 6 which is 5.

So, In this example, the copyOfRange() range is from index 1 to index 5.

Let's try to use copyOfRange() on multi-dimensional array.
Code:

public class JavaArrays
{
 
   public static void main(String[]args)
   {
     char[][] sourceArr = 
     new char[][]{{'B','r','a','i','n','y'},
                  {'G','h','o','s','t','s'}};
     char[][] destArr = 
     java.util.Arrays.copyOfRange(sourceArr,0,2);
     
     System.out.print("Source");
     System.out.println();
     System.out.print(new String(sourceArr[0]));
     System.out.print(" ");
     System.out.print(new String(sourceArr[1]));
     System.out.println();
     System.out.println();
     System.out.print("Destination");
     System.out.println();
     System.out.print(new String(destArr[0]));
     System.out.print(" ");
     System.out.print(new String(destArr[1]));
     
   }
}
In this example, we used copyOfRange() to copy an array object to another array. We see here that copyOfRange() can also be used in array type.

The Arrays.sort() Method

Next is the Arrays.sort(), to sort an array we can use the sort() method in java.util.Arrays class.
Code:

public class JavaArrays
{
 
   public static void main(String[]args)
   {
     char[] charArr = 
     new char[]{'g','b','e','l','i','c',
                'j','d','f','h','k','a'};
     java.util.Arrays.sort(charArr);
     
     System.out.println(new String(charArr));
   }
 
}
Result
abcdefghijkl
Why Should We Use Java Pre-Defined Methods

All of the pre-defined methods that we discussed here can be manually created. But, it's better to use the pre-defined methods instead of creating your own version of pre-defined methods, because first, it's already there, second, pre-defined methods are optimized for the task they can do and lastly, reinventing the method or mostly called "reinventing the wheel" is a tedious task if you ask me. It's good to create own version of pre-defined methods if you are doing it for additional knowledge, for fun or you're an expert that wants to improve the language.

Multi-Dimensional Array Performance Overhead

multidimensional arrays have performance overhead than the one dimensional array so if one dimensional array is enough for your program use one dimensional array if not then use a multidimensional or use some alternative like using different data structures like using arraylist in conjunction with hashmap to achieve 2d array like structure.

Sunday, February 3, 2019

Java tutorial: Operator precedence, expression,statements, blocks,comments, tokens

References/Links: http://pasted.co/ab27024a

Chapters
Java Precedence Table

Hello everybody! This is brainy ghosts and today we're gonna discuss java operator precedence, expression, statements, blocks and tokens. Let's start with java operator precedence, Take a look at this table.

Precedence Table
This is the precedence table from java documentation I recommend you to open the table on your browser, table link is in the References/Links link.
The closer to the top of the table an operator appears, the higher its precedence. Operators with higher precedence are evaluated before operators with relatively lower precedence. Operators on the same line have equal precedence.

When operators of equal precedence appear in the same expression, a rule must govern which is evaluated first. All binary operators except for the assignment operators are evaluated from left to right; assignment operators are evaluated right to left.

Note: postfix and unary have the same precedence because the postfix(expr++ and expr--) is just the other version of unary(++expr and --expr).

Java Precedence

Create a source file in our workspace folder then name the source file "Precedence", open it on your text editor then write the basic code structure.
Code:
public class Precedence
{

   public static void main(String[]args)
   {
     
   }

}
Alright! Let's start with this expression.
Code:
public class Precedence
{

   public static void main(String[]args)
   {
     int i = 1;
     int j = 3;     

     int intVar = 
     ++i + j++ * 2 - 1 / j << 2;

     System.out.println(intVar);
   }

}
In this example, the result is 32. How's that happened? Here's a step-by-step procedure on how we end up with the result of "32".

Initial value
i = 1; j = 3;

Initial expression
++i + j++ * 2 - 1 / j << 2

Procedure:

#1

i = 2; j = 4

2 + 3 * 2 - 1 / 4 << 2

#2

2 + 6 - 0 << 2

#3

8 << 2

Answer: 32
So, in procedure #1 we first evaluated ++i and j++. In this procedure, the first operand is 2 after we evaluated ++i, then the second operand is 3 after we evaluated j++, why 3? because j++ is a postfix increment. Then, j after the "/" operator is now 4 because j++ increment already took effect.

In procedure #2, we did the multiplication and division, in the division part the result is 0 because 1/4 = 0.25 and since our data type is int then the fractional part is discarded.

In procedure #3, we did the addition and subtraction and the remaining operator is the left shift operator. We evaluated the left shift and the result is 32.

In this procedures, we see the operation precedence in java. So, In summary, we evaluated the postfix and unary in the first procedure, then in the second procedure, we evaluated the multiplicative operators according to the precedence table, then in the third procedure, we evaluated the additive operators and lastly, we evaluated the shifts and ended up with 32.

A more complex example of java precedence

Let's try a more complex expression.
Code:
public class Precedence
{

   public static void main(String[]args)
   {
     int i = 1;
     int j = 3;     

     int intVar = 
     ++i * j++ & 5 + i++ + j++ ^ 5 + ++i / ++j | 5 << 2;

     System.out.println(intVar);
   }

}
In this example, the result is 23.Let's evaluate this expression step-by-step.
Initial value
i = 1; j = 3;

Initial expression
++i * j++ & 5 + i++ + j++ ^ 5 + ++i / ++j | 5 << 2

Procedure:

#1

i = 4; j = 6;

2 * 3 & 5 + 2 + 4 ^ 5 + 4 / 6 | 5 << 2

#2

6 & 5 + 2 + 4 ^ 5 + 0 | 5 << 2

#3

6 & 11 ^ 5 | 5 << 2

#4

6 & 11 ^ 5 | 20

#5

2 ^ 5 | 20

#6

7 | 20

Answer: 23
So, In procedure #1, we need to evaluate postfix and unary. the first operand is 2 after we evaluated ++i and the second is 3 after we evaluated j++, now i = 2 and j = 4. Then, fourth operand is 2 after we evaluated i++ and the fifth operand is 4 after we evaluated ++j, now i = 3 and j = 4. Then, seventh operand is 4 after we evaluated ++i and eighth operand is 6 after we evaluated ++j, now i = 4 and j = 6. This procedure is pretty confusing at first.

In procedure #2, we evaluated the multiplicative operators.

in procedure #3 we evaluated the additive operators.

In procedure #4 we evaluated the shift operators.

In procedure #5 we evaluated the bitwise AND, we skipped the relational and equality operators in the table because we didn't use any of those operators.

In procedure #6, we evaluated the bitwise exclusive OR operator and remaining operator is the inclusive OR operator. We evaluated the remaining operator and the result is 23.

Using parentheses() to group expressions

We can use parentheses to group expressions.Parentheses are the highest priority in java precedence. Expressions that in the parentheses will be evaluated first. We can say that the precedence in java is similar to PEMDAS(Parentheses,Exponent,Multiplication,Division,Addition and Subtraction) that we learned in math class. Let's try to group expressions.
Code:
public class Precedence
{

   public static void main(String[]args)
   {
     int i = 1;
     int j = 3;     

     int intVar = 
     (++i * j++ & 5) + (i++ + j++ ^ 5) + (++i / ++j | 5) << 2;

     System.out.println(intVar);
   }

}
This example is similar to the example above, we just put parentheses. When we compile this the result is 48. Let's evaluate this expression step-by-step.

Initial value
i = 1; j = 3;

Initial expression
(++i * j++ & 5) + (i++ + j++ ^ 5) + (++i / ++j | 5) << 2

Procedure:

#1

i = 2; j = 4;

(2 * 3 & 5) + (i++ + j++ ^ 5) + (++i / ++j | 5) << 2
(6 & 5) + (i++ + j++ ^ 5) + (++i / ++j | 5) << 2
4 + (i++ + j++ ^ 5) + (++i / ++j | 5) << 2

#2

i = 3; j = 5;

4 + (2 + 4 ^ 5) + (++i / ++j | 5) << 2
4 + (6 ^ 5) + (++i / ++j | 5) << 2
4 + 3 + (++i / ++j | 5) << 2

#3

i = 4; j = 6;

4 + 3 + (4 / 6 | 5) << 2
4 + 3 + (0 | 5) << 2
4 + 3 + 5 << 2

#4

12 << 2

Answer: 48
Compound Assignment Operator Precedence

What about compound assignment? Well, the technique to deal with compound assignment is to compute the right side operand first.
Code:
public class Precedence
{

   public static void main(String[]args)
   {
     int i = 1;
     int j = 3;    
     int intVar = 5;
    
     intVar += (++i * j++ & 5) + (i++ + j++ ^ 5) + (++i / ++j | 5) << 2;

     System.out.println(intVar);
   }

}

In this example, the result is 53. So, first, we computed the right expression and the result is 48 then we could expand the compound assignment like this: intVar = intVar + 48;

Expression

Expression is a construct made up of variables, operators, and method invocations, which are constructed according to the syntax of the language, that evaluates to a single value. You've already seen examples of expressions, Expressions are like this:


Expression #1: ++i * j++ & 5 + i++ + j++ ^ 5 + ++i / ++j | 5 << 2
Expression #2: int i = 1
Expression #3: "str is equal to str2? " + str.equals(str2)

an expression can be grouped into smaller expressions

(++i * j++ & 5) + (i++ + j++ ^ 5) + (++i / ++j | 5) << 2

By using parentheses, our single expression is now grouped into smaller expressions. Notice that I didn't include ";", that's because if I did then these codes are gonna be statements.

Some expressions need to be a statement in order to function, some be seen in control flow and method parentheses.

Statement

Statements are roughly equivalent to sentences in natural languages. A statement forms a complete unit of execution. A statement ends with ";". There are different kinds of statements : expression statements, declaration statements and control flow statements. These are expression statements.

Statement #1: int intVar = (++i * j++ & 5) + (i++ + j++ ^ 5) + (++i / ++j | 5) << 2;
Statement #2: int i = 1;
Statement #3: int i;
Statement #4: i++;

Statement #1,#2 and #3 can also be called a declaration statement.

Next is declaration statements,declaration statement declares a variable. These are declaration statements.

Statement #1: int intVar = 5;
Statement #2: int i;

Last is the control flow statements, these statements control the order in which statements get executed, they can be either a block or a statement. These are control flow statement/block

Statement #1: if(true) System.out.println("true");
Block #1
if(false)
{
   System.out.print("My ");
   System.out.println();
   System.out.println("Block");

}
Block

Block is a group of zero or more statements between balanced braces,some examples of block that we already saw are classes and methods like the main method. These are blocks.


Block #1
if(false)
{
   System.out.print("My ");
   System.out.println();
   System.out.println("Block");

}
Block #2
public static void main(String[]args)
{
   System.out.print("My ");
   System.out.println();
   System.out.println("Block");
}
Block #3
public class Precedence
{
   int i;
   double j;

   public static void main(String[]args)
   {
 
   }
}
In Block #3, we see that a block can be nested to another block. Although, Some blocks can only be nested to a particular block e.g. a method block can't be nested to another method block and can't be nested in control flow block.

A block can also be in a statement, we can call this a block statement.

Block Statement #1
int[] intArr = new int[]{2,4,6};

Block Statement #2
Runnable run = () -> 
{
  int j = 2;
  for(int i = 1; i < 6;i++)
    {
       j *= i;
       System.out.println(j);
    }
              
};
Java Comments

Comments are used to provide a piece of information about some specific parts of our code, It can also be used to document our code. Comments are not executed by the compiler.

Comment has three forms: the single line(//), multi-line(/* */) and documentation(/** */) comment.

Single line(//) comments are used to comment a single line of code.
e.g. System.out.println("String"); //prints String

Multi-line(/* */) comments are comments that use multiple lines. e.g.
/*
Adds a and b, c and d
Then multiply the result
Then prints the result on the console
*/
System.out.println("Result: " + (a + b) * (c + d));
Documentation(/** */) comments are used in javadoc tool. e.g.
public class Comments
{
  static int a = 1,b = 2,c = 3,d = 4;

  /**
  Adds a and b, c and d.
  Then multiply the result
  and prints the result on the console
  */
  public static void computeAndDisplay()
  {
   System.out.println("Result: " + (a + b) * (c + d));
  }

  public static void main(String[]args)
  {
    Comments.computeAndDisplay();
  }  

}
It looks like multi-line and documentation document are the same, but no, let's create a documentation of this code using the javadoc command. javadoc command generates a myriad of files, so, It is better to isolate our code in one folder.

Create documentation using javadoc command: javadoc Comments.java

After you successfully documented our code, you see a myriad of files, open the index.html or index-all.html then click on our method which is the computeAndDisplay() method. As you can see, our comment is in the documentation of computeAndDisplay().

Now, try changing the documentation comment to a multi-line comment and document the code again, you will see that our comment is not included in the documentation anymore.

Java Tokens

Java tokens are the littlest component in a program that is significant to the compiler. Tokens explicitly define the composition of the language. These are the java tokens.

Identifier: are used to name things like variables, methods, classes, etc.
Keywords: also called reserved keywords are words that are reserved for specific use in java, java has a total of 50 keywords.
Literals: are constant values that are used when assigning an initial value to a variable at a time of code writing.
Separators: are symbols that denote division and order of codes. These are the separators in java:
    • Parentheses():are used in precedence of expression, enclosed cast type and enclosed method paremeter/argument.
    • Braces{}: are used as enclosure to blocks like class and method block, It can also be used to enclose array values.
    • Brackets[]: are used in arrays.
    • Semicolon(;): is used to end and separate statements. It is also used in for statement.
    • Comma(,): is used to separate multiple variable declarations and can be used in for statement.
    • Colon(:): is used in lambda(method/constructor reference), foreach statement, ternary operator, switch statement and assertion.
    • Period(.): is used to separate package names and to get a class/object member like variables, methods, etc.
Operators: are used to operate on some essential task like computing, comparing, bit manipulation, etc.
Comments: are used to comment a portion of a code. It can also be used in java documentation. Comments are not executed by the compiler.

Friday, February 1, 2019

Java Tutorial: Operators

Chapters

Hello everybody! this is brainy ghosts and today we're gonna discuss the java operators. Java has several operator groups, operators are one of the essential part of every programming language for obvious reasons like computing,comparing,etc.

Assignment Operator


Let's create a java file in our workspace folder, then name it "JavaOperators", then write the basic code structure. 

Code:
public class JavaOperators
{
 
 public static void main(String[]args)
 {


 }
 
}
Alright! let's start with the assignment operator(=), you probably know this operator since I explained it in previous tutorials. This operator assigns the value on its right to the operand on its left.
public class JavaOperators
{
 
 public static void main(String[]args)
 {
  
   int intVar = 100;
  
 }
 
}
To understand that definition let's examine this code elaborately. The variables or numbers from the left and right of the operator are called operands. So, assignment operator assigns the operand value from the right to the left operand. From that explanation we can assure that the assignment operator evaluates from right to left. Operators have different ways of evaluation, some evaluates from right to left and vice versa, we will encounter some operators that evaluate from left to right.

Arithmetic Operators

Let's move on to arithmetic operators, Arithmetic operators are easy to understand because its operation and operator symbols are mostly like in mathematics, all arithmetic operators evaluate from left to right. Let's start at the additive(+) operator or the plus sign, This operator adds operands like literals and variables. Note: Unlike the "+" operator, other arithmetic operators like "-","*","/" and "%" doesn't work in String.
Code:
public class JavaOperators
{
 
 public static void main(String[]args)
 {
    String str = "Hello";
    String str2 = "Java!";
    int intVar = 100 + 1;
    String str3 = str + " " + str2;
    System.out.println(intVar);
    System.out.println(str3);
 }
 
}
Next is the subraction(-) operator, This operator substracts operands.
Code:
public class JavaOperators
{
 
 public static void main(String[]args)
 {
   int intVar = 100 - 1;
   System.out.println(intVar);
 }
 
}
Next is the multiplication(*) operator which multiply operands.
Code:
public class JavaOperators
{
 
 public static void main(String[]args)
 {
   int intVar = 100 * 2;
   System.out.println(intVar);
 }
 
}
Next is the division(/) operator which divides operands.
Code:
public class JavaOperators
{
 
 public static void main(String[]args)
 {
   int intVar = 100 / 2;
   System.out.println(intVar);
 }
 
}
Next is the modulus(%) or the remainder operator, This operator divides operands then return a remainder as a result of the operation.
Code:
public class JavaOperators
{
 
 public static void main(String[]args)
 {
   int intVar = 7 % 5;
   System.out.println(intVar);
 }
 
}
The result is 2, because 7/5 = 1 remainder 2. Also, when the dividend(left) is less than divisor(right) the operator will return the dividend as a result. try 5 % 7 and the result is 5.

Unary Operators


unary operators require only one operand; they perform various operations such as incrementing/decrementing a value by one, negating an expression, or inverting the value of a boolean.

Unary Plus(+) Operator

Let's start with the unary plus(+), This operator is rarely used because this operator indicates if the operand or expression is a positive value and since omitting this operator will automatically makes the operand positive, programmers tend to omit the plus unary to save time and reduce ambiguity when writing a code.
Code:
public class JavaOperators
{
 
 public static void main(String[]args)
 {
   int intVar = +7 + +7;
   System.out.println(intVar);
 }
 
}
In this example, we can see that "+" operator can be a unary plus or an additive operator.

Unary Minus(-) Operator

Next is the unary minus(-) which negates an operand or expression, The usage of this operator is similar to unary plus.
Code:
public class JavaOperators
{
 
 public static void main(String[]args)
 {
   int intVar = -7 - +7;
   System.out.println(intVar);
 }
 
}

In this example, we see that "-" can be a unary minus or a subtraction operator. To reduce the ambiguity of unary plus and minus, it is better to enclose the operands in parentheses.

Code: int intVar = (-7) - (+7);

Logical Complement(!) Operator

Next is the logical complement operator(!), this operator is used at boolean value and inverts it.
Code:
public class JavaOperators
{
 
 public static void main(String[]args)
 {
   boolean boolVar = !true;
   System.out.println(boolVar);
 }
 
}
Increment(++) and Decrement(--) Operator

Next is the increment(++) and decrement(--) operator. These two operators can be applied before or after the operand, The effect of the operator on the operand depends on its position. Let's define their usage first and we will use their postfix form where the operator position is at the end of the operand. The increment operator increment its operand by one and decrement operator decrement its operand by one. Now, that we know their general usage let's code their prefix and postfix positioning. let's start with postfix position.
Code:
public class JavaOperators
{
 
 public static void main(String[]args)
 {
   int intOne = 1;
   int intTwo = 1;
   System.out.println(intOne);
   System.out.println(intTwo);
   intOne++;
   intTwo--;
   System.out.println(intOne);
   System.out.println(intTwo);
 }
 
}

In this example, we see the postfix position of increment and decrement operator. Let's try prefix next.
Code:
public class JavaOperators
{
 
 public static void main(String[]args)
 {
   int intOne = 1;
   int intTwo = 1;
   System.out.println(intOne);
   System.out.println(intTwo);
   ++intOne;
   --intTwo;
   System.out.println(intOne);
   System.out.println(intTwo);
 }
 
}
When we compile and run this example, we see that the result of this code and the code before are the same. So, what's the difference between prefix and postfix? Well, in simple cases like this we can use the prefix and postfix form interchangeably but in complex cases like in multihreading or complex loops, it is essential to know their differences. Let's do an example to unveil their differences.
Code:
public class JavaOperators
{
 
 public static void main(String[]args)
 {
   int intOne = 1;
   int intTwo = ++intOne;
   System.out.println("pre: " + intTwo);
   intOne = 1; //resets intOne to 1
   intTwo = intOne++;
   System.out.println("post: " + intTwo);
 }
 
}

In this example, "++" prefix increments intOne by 1 before assigning intOne value to intTwo, that's why the first println result is 2. Next, "++" postfix assigns the value of intOne to intTwo before incrementing intOne value by 1. That's why the second println result is 1. The explanation here can work with "--".

Equality and Relational Operators


The equality and relational operators determine if one operand is greater than, less than, equal to, or not equal to another operand.

"equal to"(==) operator

Let's start with the "equal to"(==) operator, this operator compare two operands, returns true if two operands are equal, otherwise, returns false.
Code:
public class JavaOperators
{
 
 public static void main(String[]args)
 {
   int intOne = 1;
   int intTwo = 1;
   boolean bool = intOne == intTwo;
   System.out.println("Is intOne equals to intTwo? " + bool);
 }
 
}
In this example, the operator returns true because intOne and intTwo values are equal. When "==" operator is used with reference variables, then "==" operator will return true if the reference address of both variables are equal, otherwise, returns false.
Code:
public class JavaOperators
{
 
 public static void main(String[]args)
 {
   String strOne = "String";
   String strTwo = new String("String");
   System.out.println("Is intOne equals to intTwo? "
                      + (strOne == strTwo));
 }
 
}
In this example, strOne and strTwo have the same value but the result is false, that's because strOne reference is different from strTwo reference. We will learn how strOne and strTwo have different reference in future tutorials. To compare String values, use the equals() method.

Code: System.out.println("Is intOne equals to intTwo? " + strOne.equals(strTwo));

"not equal to"(!=) operator

Next is "not equal to"(!=) operator, this operator is the opposite of "equal to" operator. This operator returns true if two operands that being compared are not equal, otherwise, returns false.
Code:
public class JavaOperators
{
 
 public static void main(String[]args)
 {
   int intOne = 1;
   int intTwo = 1;
   boolean bool = intOne != intTwo;
   System.out.println("Is intOne not equals to intTwo? " + bool);
 }
 
}
Greater than(>) and less than(<) operators

Next is the greater than(>) operator, you saw this operator once in your math class, This operator returns true if the left operand is greater than the right operand, otherwise, returns false.
Code:
public class JavaOperators
{
 
 public static void main(String[]args)
 {
   int intOne = 2;
   int intTwo = 1;
   boolean bool = intOne > intTwo;
   System.out.println("Is intOne greater than intTwo? " + bool);
 }
 
}

Next is the less than(<) operator, this operator is the opposite of greater than.
Code:
public class JavaOperators
{
 
 public static void main(String[]args)
 {
   int intOne = 2;
   int intTwo = 1;
   boolean bool = intOne < intTwo;
   System.out.println("Is intOne less than intTwo? " + bool);
 }
 
}

greater than or equal to(>=) and less than or equal to(<=) operators

Next is the "greater than or equal to"(>=) and "less than or equal to"(<=) operators, >= operator returns true if the left operand is greater than or equal to the right operand, otherwise, returns false. <= operator is the opposite of >= operator.
Code:
public class JavaOperators
{
 
 public static void main(String[]args)
 {
   int intOne = 1;
   int intTwo = 1;
   System.out.println("Is intOne greater than or equal to"
              +" intTwo? "+ (intOne >= intTwo));
   System.out.println("Is intOne less than or equal to"
              +" intTwo? "+ (intOne <= intTwo));
   System.out.println("Increment intOne");
   intOne++;
   System.out.println("Is intOne greater than or equal to"
              +" intTwo? " + (intOne >= intTwo));
   System.out.println("Is intOne less than or equal to"
              +" intTwo? " + (intOne <= intTwo));
 }
 
}

"=" operator vs "==" operator

Remember that "=" operator and "==" operator are different. "=" operator is the asssignment operator that assigns a value whereas "==" operator is the equal to operator that compare two operands and returns a boolean value. Some beginners get confuse with this two operators.

Conditional Operators


Conditional-AND(&&) and Conditional-OR(||) operators

Next is the conditional operators. "&&" and "||" operators perform Conditional-AND and Conditional-OR operations on two boolean expressions. These operators exhibit "short-circuiting" behavior, which means that the second operand is evaluated only if needed.
Code:
public class JavaOperators
{
 
 public static void main(String[]args)
 {
   int intOne = 1;
   int intTwo = 1;
   boolean bool = (intOne == 1 && intTwo == 1);
   System.out.println("is intOne and intTwo equals to 1? "
                      + bool); //1st println
   intOne = 2;
   intTwo = 1;
   bool = (intOne == 1 && intTwo == 1);
   System.out.println("is intOne and intTwo equals to 1? "
                      + bool); //2nd println
   intOne = 1;
   intTwo = 1;
   bool = (intOne == 1 || intTwo == 1);
   System.out.println("is intOne or intTwo equals to 1? "
                      + bool); //3rd println
   intOne = 2;
   intTwo = 1;
   bool = (intOne == 1 || intTwo == 1);
   System.out.println("is intOne or intTwo equals to 1? "
                      + bool); //4th println
   intOne = 2;
   intTwo = 2;
   bool = (intOne == 1 || intTwo == 1);
   System.out.println("is intOne or intTwo equals to 1? "
                      + bool); //5th println
 }
 
}
"&&" checks the left and right conditions or operands, if you will. When both conditions are true then the result is true otherwise, the result is false.On the first println(), the result is true because intOne is equal to 1 and intTwo is equal to 1. If the left condition is true then "&&" operator checks the right condition next, if the right condition is true then the overall result is true, otherwise, false. On the second println() the result is false because intOne is not equal to 1. In this case, the left condition is false, therefore "&&" operator doesn't check the right condition and return false as a result. Thus, exhibiting "short-circuiting" behavior.

Next, "||" operator checks the left and right condition, when both or just one condition is true then the result is true, if both conditions are false then the result is false. On the third println() the result is true because both conditions are true, In this case, the left condition is true, therefore, "||" doesn't need to check the right condition. Thus, exhibiting "short-circuiting" behavior. On the fourth println(), the result is still true because, intTwo is equal to 1, In this case, though, the left condition is false, therefore, "||" checks the second condition and since one of the condition is true, the result is still true. The 5th println() result is false because both conditions are false.

Ternary(?:) Operator

ternary(?:) operator can be thought of if-then-else shorthand, if-then-else is part of the control flow statement topic so I won't cover if-then-else but I will demonstrate the ternary operator so you will have an idea on how if-then-else works.
Ternary operator general form: condition ? value1 : value2;
Code:
public class JavaOperators
{
 
 public static void main(String[]args)
 {
   int intOne = 2;
   int intTwo = 1;
   int intThree = (intOne > intTwo) ? intOne : intTwo;
   System.out.println(intThree);
 }
 
}
In this example, if the condition(intOne > intTwo) is true then value1 will be returned to intThree, if the condition is false, then value2 will be returned to intThree. That's why the result is 2 because intOne is greater than intTwo and in our ternary operation intOne is value1.By the way, The parentheses in condition are optional.

Type Comparison Operator


The type comparison operator or instanceof compares an object to a specified type. You can use it to test if an object is an instance of a class, an instance of a subclass, or an instance of a class that implements a particular interface. instanceof is used in typecasting objects.
General Form: object instanceof object-type;
Note: Since java14, instanceof now throws a compilation error instead of runtime error when the two operands are not compatible with each other.
Code:
interface I{}

class A{}

class B extends A implements I{}


public class JavaOperators
{
 
 public static void main(String[]args)
 {
   A a = new A();
   B b = new B();
   
   System.out.println("a instance of B? "
              + (a instanceof B)); //1st println()
   System.out.println("b instance of A? "
              + (b instanceof A)); //2nd println()
   System.out.println("a instance of I? "
              + (a instanceof I)); //3rd println()
   System.out.println("b instance of I? " 
              + (b instanceof I)); //4th println()
   
 }
 
}

In this example, we created an interface and two classes, then we instantiated those classes and compare if they are an instance of an object. On the first println we compare a to class B, and the result is false because class A is a parent class of class B. On the second println() the result is true because B is a subclass of A. On the third println() the result is false class A is not related to interface I. On the fourth println() the result is true because B implemented interface I. Remember that instanceof works with objects and doesn't work with primitive types.

If we reference a null value to a reference variable and use it in instanceof, instanceof will return false.
Code:
interface I{}

class A{}

class B extends A implements I{}


public class JavaOperators
{
 
 public static void main(String[]args)
 {
   B b = null;
   
   System.out.println("b instance of A? " + (b instanceof A));
   
 }
 
}
Don't be overwhelmed by those new keywords and syntax in this example, we will tackle those as we progress further. Just focus on the function of instanceof for now.

Bitwise and Shift Operators


Next is bitwise and bit shift operators. bitwise and bit shift operators are used to manipulate data bits. These operators are less commonly used.

Unary bitwise complement(~) operator

Let's start with the "unary bitwise complement"(~) also called binary ones complement operator, this operator inverts a bit pattern, just like one's complement, let's try it! For the sake of simplicity we will use the byte data type for some bitwise example so we can easily understand the operators that will be discussed here. Unary bitwise can be categorized in unary operators group or in bitwise and shift operator, I just put it in bitwise and shift operator because I think this operator is more related in this category.
Code:
public class JavaOperators
{
 
 public static void main(String[]args)
 {
   int intOne = ~1;
   System.out.println(intOne);
 }
 
}
In this example, the result is -2. To check if the result is correct open windows calculator if you're using windows go to programmer mode, click the Dword radio box, click the initial number(1) and click the "Not" button.

When you type 1 pay attention to the bits on calculator then click "Not" button. You see the zeroes have been flipped to ones and ones have been flipped to zeroes. The result is negative because we're dealing with signed bits when using "~" operator.

Bitwise AND(&) operator

Next is the bitwise AND(&), this operator evaluates each bit of two operands at the same time. If two operands bit is 1 then the result is one, then all other cases result to 0. Let's declare another byte variables let's try the values 50 and 25, then use the bitwise AND and compile and run.
Code:
public class JavaOperators
{
 
 public static void main(String[]args)
 {
   byte byteOne = 50;
   byte byteTwo = 25;
   int intThree = byteOne & byteTwo;
   System.out.println(intThree);
 }
 
}
I used int as intThree data type because the result of the "&" and other bitwise and shift operators are treated as int. If you change intThree data type to byte you will encounter a conversion error. The result of this example is 16. To check if the result is correct laid out their binaries like this:


In this illustration, we see when both operands' bits are 1, the result is 1. When one of the operand bits is 0 then the result is 0.

If you want more proof that our result is correct, open windows calculator if you're using windows, then click the byte radio button, type the first operand, click the "And" button then type the second operand and click "=" button. You see the result is 16.

Bitwise Inclusive OR(|) Operator

Next is the inclusive OR(|) or OR for short. This operator is like the AND but its process is different. If the bits of either operand are 1, the result is 1. all other cases result to 0.
Code:
public class JavaOperators
{
 
 public static void main(String[]args)
 {
   byte byteOne = 50;
   byte byteTwo = 25;
   int intThree = byteOne | byteTwo;
   System.out.println(intThree);
 }
 
}

The result of this example is 59. To compute the result manually try to laid out their binary like this:


In this illustration, we see that if one of the operand bit is 1 or both operands bit are 1 then the result is 1, if both operands bit are 0 then the result is 0.

If you want more proof that our result is correct, open windows calculator if you're using windows, then click the byte radio button, type the first operand, click the "Or" button then type the second operand and click "=" button. You see the result is 59.

Bitwise Exclusive OR(^) Operator

Next is the exclusive OR(^) or XOR for short. This operator is just like inclusive OR but with different rules. If only one of the operand bits is 1 the result is 1, All other cases result to 0.
Code:
public class JavaOperators
{
 
 public static void main(String[]args)
 {
   byte byteOne = 50;
   byte byteTwo = 25;
   int intThree = byteOne ^ byteTwo;
   System.out.println(intThree);
 }
 
}

The result of this example is 43. To compute the result manually try to laid out their binary like this:


In this illustration, we see that when one of the operand bit is 1 then the result is 1, when both operands bit are 1 or 0 then the result is 0.
If you want more proof that our result is correct, open windows calculator if you're using windows, then click the byte radio button, type the first operand, click the "Xor" button then type the second operand and click "=" button. You see the result is 43.

Signed Left Shift(<<) Operator

Signed left shift(<<) shifts bits to the left depending on the specified number of shifts, for example, let's try to shift 50 by 2 shifts. The left operand is the one that will be shifted and the right operand is the number of shift
Code:
public class JavaOperators
{
 
 public static void main(String[]args)
 {
   byte byteOne = 50;
   int intTwo = byteOne << 2;
   System.out.println(intTwo);
 }
 
}
open the windows calculator then go to programmer mode then type 50 with dec radio button selected then select Dword then click the Lsh button "Lsh" is the left shift operator then type the number of shift you want in our case we need 2 shifts. As you can see the result is 200 which is the same result on the console, but why? When we do the signed left shift it will add zeroes to the rightmost bit this bit is also called Least Significant Bit or LSB for short. Here are illustrations that explains how signed left shift works.


when we shift bits, the leftmost bit also called Most Significant Bit or MSB for short will be lost once they are shifted out from position 31 if int and position 63 if long. See the number on the bottom of bits in the calculator? that's the position that I'm talking about. We can see that the bit index in the calculator starts at 0.


Let's do another example, let's try -50 then left shift it to 8.
Code:
public class JavaOperators
{
 
 public static void main(String[]args)
 {
   byte byteOne = -50;
   int intTwo = byteOne << 8;
   System.out.println(intTwo);
 }
 
}
And the result is -12800. Here is an illustration that explains how we got the result.


If you want to check the result on the calculator: go to programmer mode then type 50 with dec radio button selected then click the "+" with "-" button also called the negate button then select Dword then click the Lsh button then type the number of shifts you want in our case we need 8 shifts.

Signed Right Shift(>>) Operator

Next is the signed right shift(>>), this operator shifts bits to the right. As you might have notice this operator has similar procedure to signed left shift but their differences are essential, One of their difference is obvious signed left shift shifts bits from right to left while this operator shifts bits from left to right.

Another difference is the signed right shift is sign dependent. You might asked "how signed right shift is sign dependent? you can't put a positive or negative sign to a binary.", Well, I already discussed how binary represents sign numbers I'll just add some additional information here, Open the window's calculator and select the byte radio button, type 127 and notice the binary.


As you can see the last bit position of byte which is position 7 is zero.

next type 128, reset the values on the calculator first then set the radio button to word because we can't type 128 when we're in the byte range, so, click the Word radio button, type 128 then switch back to byte.


Notice that the positive 128 became negative 128 and in the last bit position of byte which is position 7 is now 1, now, did you get what i'm trying to say? well, if not let me tell you, When the last bit position is zero it means that the binary is representing a positive number and when the last bit position is 1 it means that the binary is representing a negative number, this is only applicable on signed type like byte and all signed type in java, this is not applicable to unsigned type like char because unsigned type only represents positive numbers.

Why do we need to know this? Well, signed right shift depends on the last bit position when shifting bits,for example, let's try -50 then shift it to 2 then compile and run.
Code:
public class JavaOperators
{
 
 public static void main(String[]args)
 {
   byte byteOne = -50;
   int intTwo = byteOne >> 2;
   System.out.println(intTwo);
 }
 
}
In this example, the result is -13. Here are illustrations that show how signed right shift works with negative numbers.


In these Illustrations, we see that the two bits from the right side has been lost and two 1's bits were added to the left side.

You can check our result by using windows calculator: go to programmer mode then type 50 with dec radio button selected then click the "+" with "-" button also called the negate button then select byte radio button then click the Rsh button, "Rsh" is the right shift in the calculator then type the number of shifts you want in our case we need 2 shifts.

Now let's try positive 50 then shift it to 2.
Code:
public class JavaOperators
{
 
 public static void main(String[]args)
 {
   byte byteOne = 50;
   int intTwo = byteOne >> 2;
   System.out.println(intTwo);
 }
 
}
In this example, the result is 12. Here are illustrations that show how signed right shift works with positive numbers


In these Illustrations, we see that the two bits from the right side has been lost and two 0's bits were added to the left side.

Unsigned Right Shift(>>>) Operator

Next is the unsigned right shift(>>>), This operator shifts bits to the right just like signed right shift their difference is that this operator is not sign dependent, it means that this operator will only add zeroes to the right no matter what the value of the Most Significant bit, whereas signed right shift is sign dependent. Let's try an example.
Code:
public class JavaOperators
{
 
 public static void main(String[]args)
 {
   byte byteOne = -50;
   int intTwo = byteOne >>> 2;
   System.out.println(intTwo);
 }
 
}

In this example, the result is 1073741811. How's that happened? Here are illustrations that show how unsigned right shift operator works.


In these illustrations, we see that the bits of -50 on the right side was gone and two zeroes was added on the left side. That's why the result is 1073741811. This operator sometimes doesn't work well with byte and short because the result of >>> operator is treated as int, if we downcast the result of this operator to byte, we might get an unexpected result. But why? You can check my blog about typecasting primitive types and go to the section: "Downcasting a value that exceeds destination's capacity"

Compound Assignment Operators


Next is the compound assignment operators, these operators are shorthand of an operation and assignment. Let's try the "+=" operator, this operator adds the left operand to the right operand and assigns the result to left operand, let's try an example.
Code:
public class JavaOperators
{
 
 public static void main(String[]args)
 {
   byte byteOne = 50;
   byteOne += 50;
   //byteOne = byteOne + 50; //equivalent equation to: byteOne += 50;
   System.out.println(byteOne);
 }
 
}

In this example, the result is 100. Make sure to initialize the variable first before using the compound assignment, if you don't, you will encounter an error.
Code:
public class JavaOperators
{
 
 public static void main(String[]args)
 {
   byte byteOne += 50; //error
   System.out.println(byteOne);
 }
 
}

There are other shorthands as you see from the figure earlier and their functions are similar to this "+=" operator that I demonstrated, I think these operators are fairly easy so I'll leave it to you to explore and try.